🇺🇸 English
# 🚀 vServer - Functional Web Server on Go
> Full-featured web server with HTTP/HTTPS, MySQL, PHP support and GUI admin panel
**👨💻 Author:** Roman Sumaneev
**🌐 Website:** [voxsel.ru](https://voxsel.ru)
**📞 Contact:** [VK](https://vk.com/felias)
## 🎯 Features
 ### 🌐 Web Server
- ✅ **HTTP/HTTPS** server with SSL certificate support
- ✅ **Proxy server** for request proxying
- ✅ **PHP server** with built-in PHP 8 support
- ✅ **Static content** for hosting websites
- ✅ **vAccess** - access control system for sites and proxies
### 🗄️ Database
- ✅ **MySQL server** with full support
### 🔧 Administration
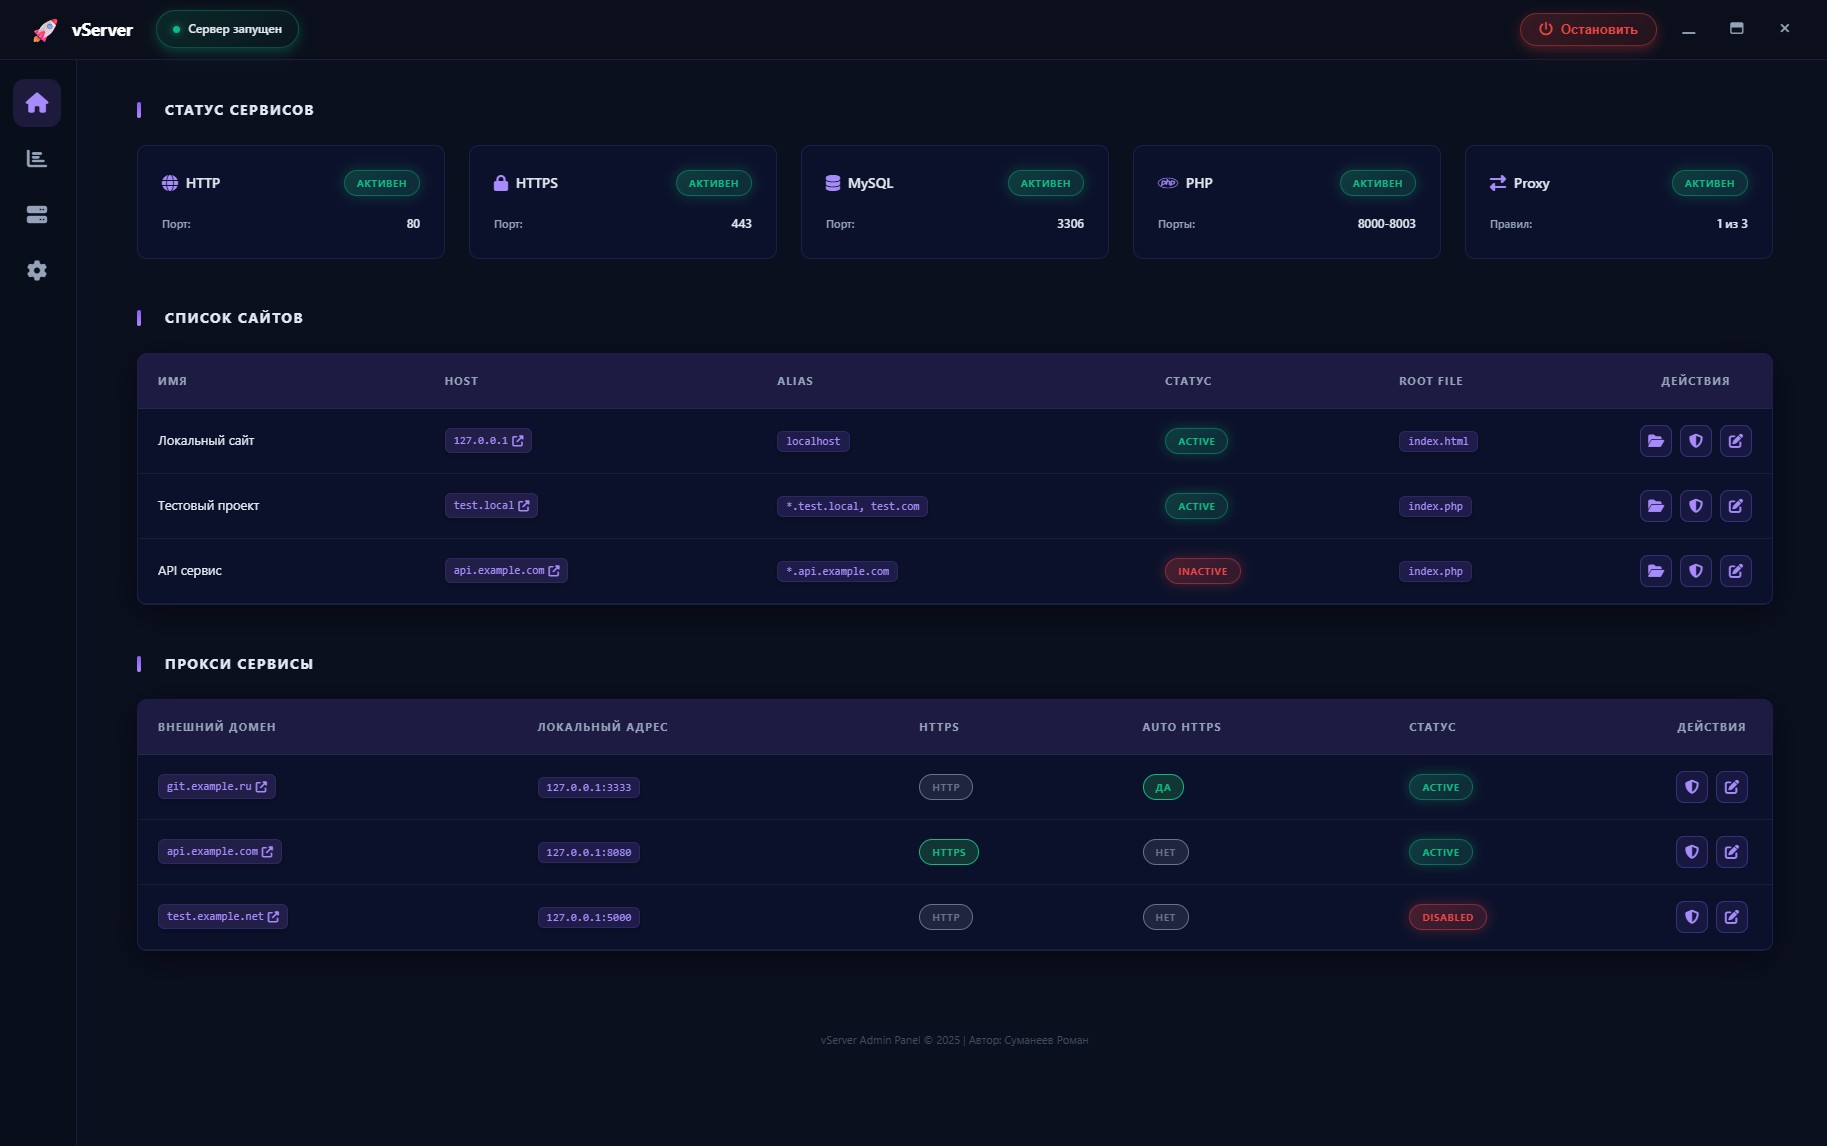
- ✅ **GUI Admin Panel** - Wails desktop application with modern interface
- ✅ **Service Management** - start/stop HTTP, HTTPS, MySQL, PHP, Proxy
- ✅ **Site and Proxy Editor** - visual configuration management
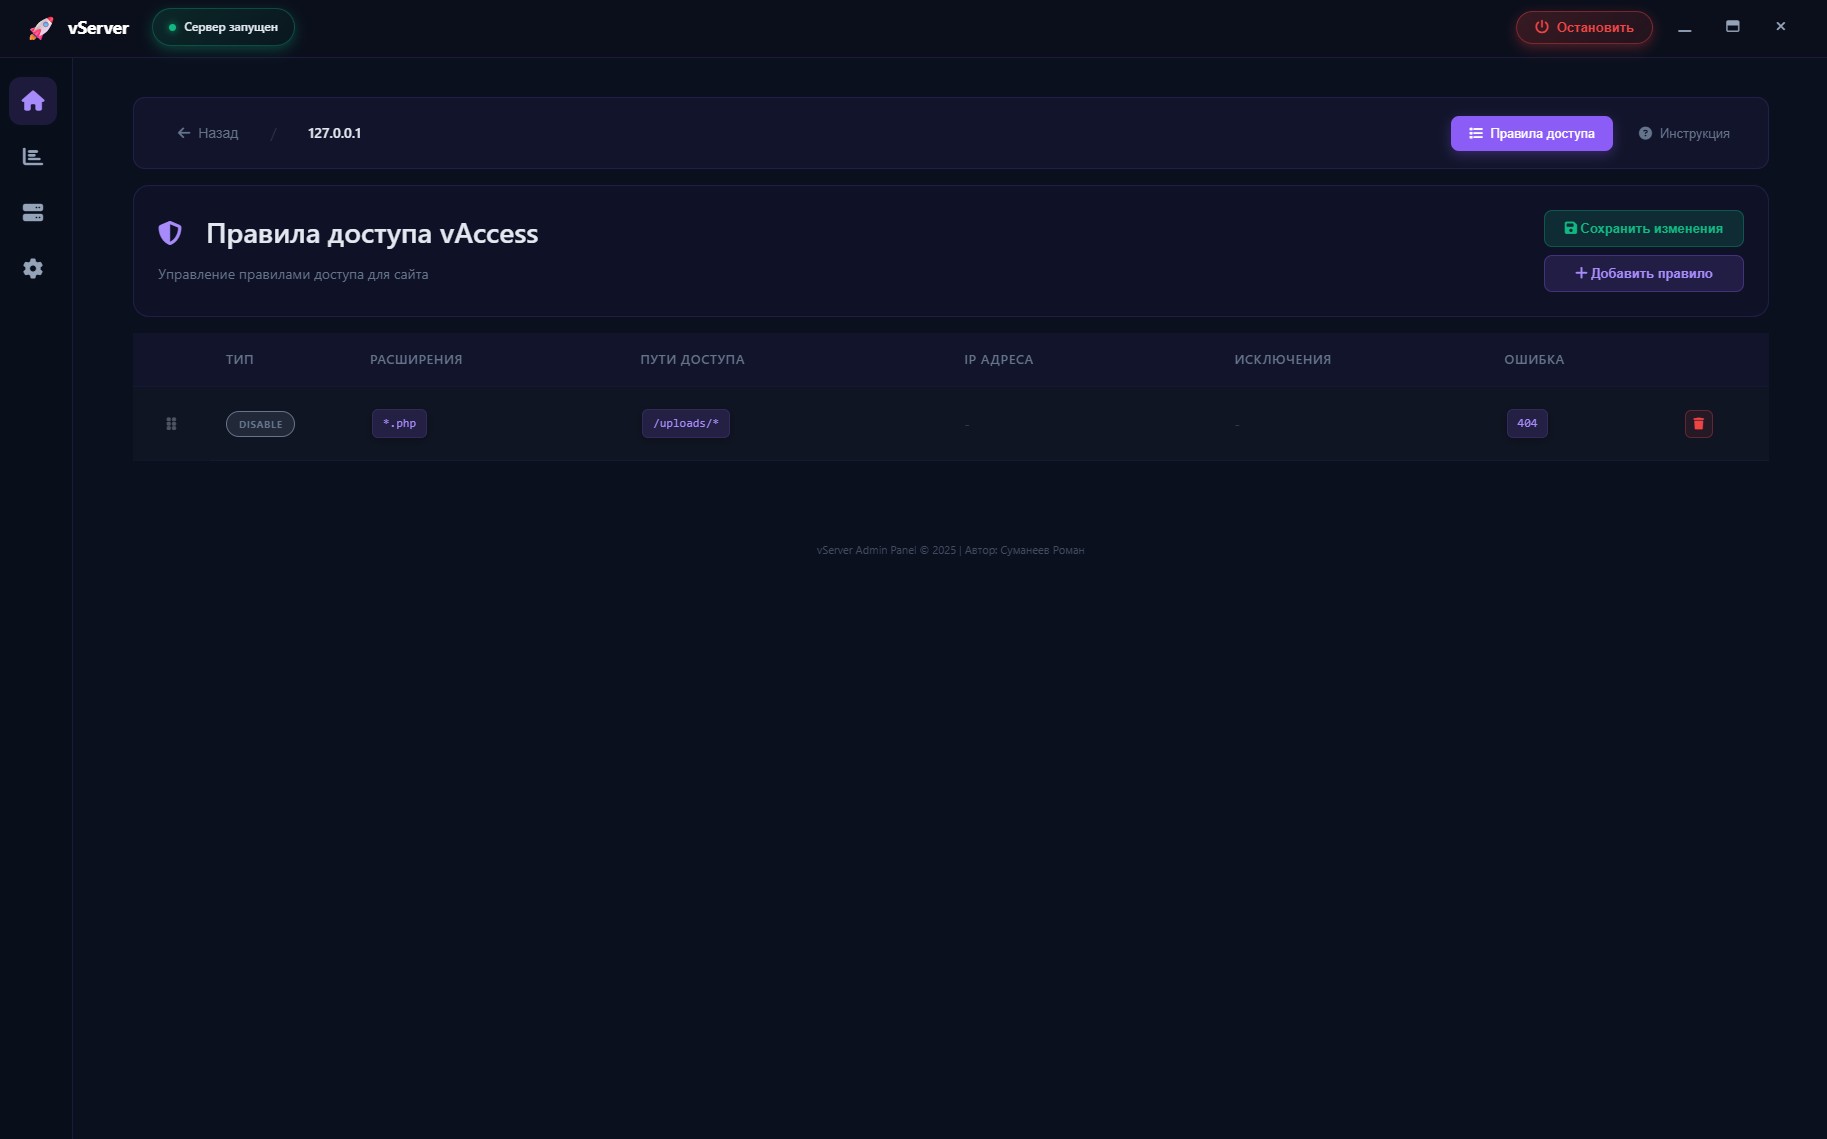
- ✅ **vAccess Editor** - access rules configuration through interface
## 🏗️ Architecture
```
vServer/
├── 🎯 main.go # Main server entry point
│
├── 🔧 Backend/ # Core logic
│ │
│ ├── admin/ # | 🎛️ GUI Admin Panel (Wails) |
│ │ ├── go/ # | Go backend for admin panel |
│ │ └── frontend/ # | Modern UI |
│ │
│ ├── config/ # | 🔧 Go configuration files |
│ ├── tools/ # | 🛠️ Utilities and helpers |
│ └── WebServer/ # | 🌐 Web server modules |
│
├── 🌐 WebServer/ # Web content and configuration
│ │
│ ├── cert/ # | 🔐 SSL certificates |
│ ├── soft/ # | 📦 MySQL and PHP |
│ ├── tools/ # | 📊 Logs and tools |
│ └── www/ # | 🌍 Web content |
│
├── 📄 go.mod # Go modules
├── 🔨 build_admin.ps1 # Build GUI admin panel
└── 🚀 vSerf.exe # GUI admin panel (after build)
```
## 🚀 Installation and Launch
### 🔨 Building the Main Server
```powershell
./build_admin.ps1
```
The script will automatically:
- Check/create `go.mod`
- Install dependencies (`go mod tidy`)
- Check/install Wails CLI
- Build the application → `vSerf.exe`
### 📦 Component Preparation
1. Extract `WebServer/soft/soft.rar` archive to `WebServer/soft/` folder
2. Run `vServer.exe` - main server
3. Run `vSerf.exe` - GUI admin panel for management
> 🔑 **Important:** Default MySQL password is `root`
### 📦 Ready Project for Users
Required for operation:
- 📄 `vSerf.exe` - GUI admin panel (optional)
- 📁 `WebServer/` - configuration and resources
> 💡 The `Backend/` folder and `go.mod`, `main.go` files are only needed for development
## ⚙️ Configuration
Configuration via `WebServer/config.json`:
```json
{
"Site_www": [
{
"name": "Local Site",
"host": "127.0.0.1",
"alias": ["localhost"],
"status": "active",
"root_file": "index.html",
"root_file_routing": true
}
],
"Proxy_Service": [
{
"Enable": true,
"ExternalDomain": "git.example.com",
"LocalAddress": "127.0.0.1",
"LocalPort": "3333",
"ServiceHTTPSuse": false,
"AutoHTTPS": true
}
],
"Soft_Settings": {
"mysql_port": 3306, "mysql_host": "127.0.0.1",
"php_port": 8000, "php_host": "localhost",
"proxy_enabled": true
}
}
```
**Main Parameters:**
- `Site_www` - website settings
- `Proxy_Service` - proxy service configuration
- `Soft_Settings` - service ports and hosts (MySQL, PHP, proxy_enabled)
### 🌐 Alias with Wildcard Support
Wildcard (`*`) support in aliases for sites:
```json
{
"alias": [
"*.test.com", // All subdomains of test.com
"*.test.ru", // All subdomains of test.ru
"test.com", // Exact match
"api.*" // api with any zone
],
"host": "test.com"
}
```
**Wildcard Examples:**
- `*.example.com` → `api.example.com`, `admin.example.com`, `test.example.com` ✅
- `example.*` → `example.com`, `example.ru`, `example.org` ✅
- `*example.com` → `test-example.com`, `my-example.com` ✅
- `*` → any domain ✅ (use carefully!)
- `example.com` → only `example.com` ✅ (without wildcard)
### 🔄 Proxy Server
The proxy server allows redirecting external requests to local services.
**Proxy_Service Parameters:**
- `Enable` - enable/disable proxy (true/false)
- `ExternalDomain` - external domain for request interception
- `LocalAddress` - local service address
- `LocalPort` - local service port
- `ServiceHTTPSuse` - use HTTPS for connecting to local service (true/false)
- `AutoHTTPS` - automatically redirect HTTP → HTTPS (true/false)
**Multiple Proxy Example:**
```json
"Proxy_Service": [
{
"Enable": true,
"ExternalDomain": "git.example.com",
"LocalAddress": "127.0.0.1",
"LocalPort": "3000",
"ServiceHTTPSuse": false,
"AutoHTTPS": true
},
{
"Enable": false,
"ExternalDomain": "api.example.com",
"LocalAddress": "127.0.0.1",
"LocalPort": "8080",
"ServiceHTTPSuse": false,
"AutoHTTPS": false
}
]
```
#### 📖 Detailed Parameter Description:
**`ServiceHTTPSuse`** - protocol for connecting to local service:
- `false` - vServer connects to local service via HTTP (default)
- `true` - vServer connects to local service via HTTPS
**`AutoHTTPS`** - automatic HTTPS redirect:
- `true` - all HTTP requests are automatically redirected to HTTPS (recommended)
- `false` - both HTTP and HTTPS requests are allowed
**How it Works:**
```
Client (HTTP/HTTPS) → vServer (AutoHTTPS check) → Local Service (ServiceHTTPSuse)
```
**Applying Changes:**
- Enter `config_reload` command in console to reload configuration
- Changes will apply to new requests without server restart
## 🔒 vAccess - Access Control System
vServer includes a flexible access control system **vAccess** for sites and proxy services.
### 📁 Configuration Locations
**For Sites:**
```
WebServer/www/{host}/vAccess.conf
```
**For Proxy:**
```
WebServer/tools/Proxy_vAccess/{domain}_vAccess.conf
```
### ⚙️ Main Features
- ✅ **IP Filtering** - allow/block by IP addresses
- ✅ **Path Control** - restrict access to specific directories
- ✅ **File Filtering** - block by extensions (*.php, *.exe)
- ✅ **Exceptions** - flexible rules with exceptions_dir
- ✅ **Custom Errors** - redirects or error pages
### 📝 Configuration Example
```conf
# Allow admin panel only from local IPs
type: Allow
path_access: /admin/*, /api/admin/*
ip_list: 127.0.0.1, 192.168.1.100
url_error: 404
# Block dangerous files in uploads
type: Disable
type_file: *.php, *.exe, *.sh
path_access: /uploads/*
url_error: 404
```
### 📚 Documentation
Detailed vAccess documentation:
- **For Sites:** see `WebServer/www/{host}/vAccess.conf` (examples in file)
- **For Proxy:** see `WebServer/tools/Proxy_vAccess/README.md`
## 📝 Logging
All logs are saved in `WebServer/tools/logs/`:
- 🌐 `logs_http.log` - HTTP requests (including proxy P-HTTP)
- 🔒 `logs_https.log` - HTTPS requests (including proxy P-HTTPS)
- 🔄 `logs_proxy.log` - Proxy server errors
- 🗄️ `logs_mysql.log` - MySQL operations
- 🐘 `logs_php.log` - PHP errors
- ⚙️ `logs_config.log` - Configuration
- 🔐 `logs_vaccess.log` - Access control for sites
- 🔐 `logs_vaccess_proxy.log` - Access control for proxy
## 🔐 SSL Certificates
### Certificate Installation
1. Open `WebServer/` directory
2. Create `cert/` folder (if it doesn't exist)
3. Create a folder with your domain name or IP address
4. Place certificate files with **exact** names:
```
certificate.crt
private.key
ca_bundle.crt
```
5. Certificate will be automatically loaded at server startup
### 📁 Certificate Structure
```
WebServer/
└── cert/
├── example.com/ # Main domain
│ ├── certificate.crt
│ ├── private.key
│ └── ca_bundle.crt
│
└── sub.example.com/ # Subdomain (optional)
├── certificate.crt
├── private.key
└── ca_bundle.crt
```
### 🎯 Working with Subdomains
**Important:** If no separate folder is created in `cert/` for a subdomain, the parent domain's certificate will be used automatically.
**Examples:**
- ✅ Request to `example.com` → uses certificate from `cert/example.com/`
- ✅ Request to `sub.example.com` (folder exists) → uses `cert/sub.example.com/`
- ✅ Request to `sub.example.com` (folder does NOT exist) → uses `cert/example.com/`
**This is convenient for wildcard certificates:** one certificate in the main domain folder is enough for all subdomains! 🌟
### 🌐 Web Server
- ✅ **HTTP/HTTPS** server with SSL certificate support
- ✅ **Proxy server** for request proxying
- ✅ **PHP server** with built-in PHP 8 support
- ✅ **Static content** for hosting websites
- ✅ **vAccess** - access control system for sites and proxies
### 🗄️ Database
- ✅ **MySQL server** with full support
### 🔧 Administration
- ✅ **GUI Admin Panel** - Wails desktop application with modern interface
- ✅ **Service Management** - start/stop HTTP, HTTPS, MySQL, PHP, Proxy
- ✅ **Site and Proxy Editor** - visual configuration management
- ✅ **vAccess Editor** - access rules configuration through interface
## 🏗️ Architecture
```
vServer/
├── 🎯 main.go # Main server entry point
│
├── 🔧 Backend/ # Core logic
│ │
│ ├── admin/ # | 🎛️ GUI Admin Panel (Wails) |
│ │ ├── go/ # | Go backend for admin panel |
│ │ └── frontend/ # | Modern UI |
│ │
│ ├── config/ # | 🔧 Go configuration files |
│ ├── tools/ # | 🛠️ Utilities and helpers |
│ └── WebServer/ # | 🌐 Web server modules |
│
├── 🌐 WebServer/ # Web content and configuration
│ │
│ ├── cert/ # | 🔐 SSL certificates |
│ ├── soft/ # | 📦 MySQL and PHP |
│ ├── tools/ # | 📊 Logs and tools |
│ └── www/ # | 🌍 Web content |
│
├── 📄 go.mod # Go modules
├── 🔨 build_admin.ps1 # Build GUI admin panel
└── 🚀 vSerf.exe # GUI admin panel (after build)
```
## 🚀 Installation and Launch
### 🔨 Building the Main Server
```powershell
./build_admin.ps1
```
The script will automatically:
- Check/create `go.mod`
- Install dependencies (`go mod tidy`)
- Check/install Wails CLI
- Build the application → `vSerf.exe`
### 📦 Component Preparation
1. Extract `WebServer/soft/soft.rar` archive to `WebServer/soft/` folder
2. Run `vServer.exe` - main server
3. Run `vSerf.exe` - GUI admin panel for management
> 🔑 **Important:** Default MySQL password is `root`
### 📦 Ready Project for Users
Required for operation:
- 📄 `vSerf.exe` - GUI admin panel (optional)
- 📁 `WebServer/` - configuration and resources
> 💡 The `Backend/` folder and `go.mod`, `main.go` files are only needed for development
## ⚙️ Configuration
Configuration via `WebServer/config.json`:
```json
{
"Site_www": [
{
"name": "Local Site",
"host": "127.0.0.1",
"alias": ["localhost"],
"status": "active",
"root_file": "index.html",
"root_file_routing": true
}
],
"Proxy_Service": [
{
"Enable": true,
"ExternalDomain": "git.example.com",
"LocalAddress": "127.0.0.1",
"LocalPort": "3333",
"ServiceHTTPSuse": false,
"AutoHTTPS": true
}
],
"Soft_Settings": {
"mysql_port": 3306, "mysql_host": "127.0.0.1",
"php_port": 8000, "php_host": "localhost",
"proxy_enabled": true
}
}
```
**Main Parameters:**
- `Site_www` - website settings
- `Proxy_Service` - proxy service configuration
- `Soft_Settings` - service ports and hosts (MySQL, PHP, proxy_enabled)
### 🌐 Alias with Wildcard Support
Wildcard (`*`) support in aliases for sites:
```json
{
"alias": [
"*.test.com", // All subdomains of test.com
"*.test.ru", // All subdomains of test.ru
"test.com", // Exact match
"api.*" // api with any zone
],
"host": "test.com"
}
```
**Wildcard Examples:**
- `*.example.com` → `api.example.com`, `admin.example.com`, `test.example.com` ✅
- `example.*` → `example.com`, `example.ru`, `example.org` ✅
- `*example.com` → `test-example.com`, `my-example.com` ✅
- `*` → any domain ✅ (use carefully!)
- `example.com` → only `example.com` ✅ (without wildcard)
### 🔄 Proxy Server
The proxy server allows redirecting external requests to local services.
**Proxy_Service Parameters:**
- `Enable` - enable/disable proxy (true/false)
- `ExternalDomain` - external domain for request interception
- `LocalAddress` - local service address
- `LocalPort` - local service port
- `ServiceHTTPSuse` - use HTTPS for connecting to local service (true/false)
- `AutoHTTPS` - automatically redirect HTTP → HTTPS (true/false)
**Multiple Proxy Example:**
```json
"Proxy_Service": [
{
"Enable": true,
"ExternalDomain": "git.example.com",
"LocalAddress": "127.0.0.1",
"LocalPort": "3000",
"ServiceHTTPSuse": false,
"AutoHTTPS": true
},
{
"Enable": false,
"ExternalDomain": "api.example.com",
"LocalAddress": "127.0.0.1",
"LocalPort": "8080",
"ServiceHTTPSuse": false,
"AutoHTTPS": false
}
]
```
#### 📖 Detailed Parameter Description:
**`ServiceHTTPSuse`** - protocol for connecting to local service:
- `false` - vServer connects to local service via HTTP (default)
- `true` - vServer connects to local service via HTTPS
**`AutoHTTPS`** - automatic HTTPS redirect:
- `true` - all HTTP requests are automatically redirected to HTTPS (recommended)
- `false` - both HTTP and HTTPS requests are allowed
**How it Works:**
```
Client (HTTP/HTTPS) → vServer (AutoHTTPS check) → Local Service (ServiceHTTPSuse)
```
**Applying Changes:**
- Enter `config_reload` command in console to reload configuration
- Changes will apply to new requests without server restart
## 🔒 vAccess - Access Control System
vServer includes a flexible access control system **vAccess** for sites and proxy services.
### 📁 Configuration Locations
**For Sites:**
```
WebServer/www/{host}/vAccess.conf
```
**For Proxy:**
```
WebServer/tools/Proxy_vAccess/{domain}_vAccess.conf
```
### ⚙️ Main Features
- ✅ **IP Filtering** - allow/block by IP addresses
- ✅ **Path Control** - restrict access to specific directories
- ✅ **File Filtering** - block by extensions (*.php, *.exe)
- ✅ **Exceptions** - flexible rules with exceptions_dir
- ✅ **Custom Errors** - redirects or error pages
### 📝 Configuration Example
```conf
# Allow admin panel only from local IPs
type: Allow
path_access: /admin/*, /api/admin/*
ip_list: 127.0.0.1, 192.168.1.100
url_error: 404
# Block dangerous files in uploads
type: Disable
type_file: *.php, *.exe, *.sh
path_access: /uploads/*
url_error: 404
```
### 📚 Documentation
Detailed vAccess documentation:
- **For Sites:** see `WebServer/www/{host}/vAccess.conf` (examples in file)
- **For Proxy:** see `WebServer/tools/Proxy_vAccess/README.md`
## 📝 Logging
All logs are saved in `WebServer/tools/logs/`:
- 🌐 `logs_http.log` - HTTP requests (including proxy P-HTTP)
- 🔒 `logs_https.log` - HTTPS requests (including proxy P-HTTPS)
- 🔄 `logs_proxy.log` - Proxy server errors
- 🗄️ `logs_mysql.log` - MySQL operations
- 🐘 `logs_php.log` - PHP errors
- ⚙️ `logs_config.log` - Configuration
- 🔐 `logs_vaccess.log` - Access control for sites
- 🔐 `logs_vaccess_proxy.log` - Access control for proxy
## 🔐 SSL Certificates
### Certificate Installation
1. Open `WebServer/` directory
2. Create `cert/` folder (if it doesn't exist)
3. Create a folder with your domain name or IP address
4. Place certificate files with **exact** names:
```
certificate.crt
private.key
ca_bundle.crt
```
5. Certificate will be automatically loaded at server startup
### 📁 Certificate Structure
```
WebServer/
└── cert/
├── example.com/ # Main domain
│ ├── certificate.crt
│ ├── private.key
│ └── ca_bundle.crt
│
└── sub.example.com/ # Subdomain (optional)
├── certificate.crt
├── private.key
└── ca_bundle.crt
```
### 🎯 Working with Subdomains
**Important:** If no separate folder is created in `cert/` for a subdomain, the parent domain's certificate will be used automatically.
**Examples:**
- ✅ Request to `example.com` → uses certificate from `cert/example.com/`
- ✅ Request to `sub.example.com` (folder exists) → uses `cert/sub.example.com/`
- ✅ Request to `sub.example.com` (folder does NOT exist) → uses `cert/example.com/`
**This is convenient for wildcard certificates:** one certificate in the main domain folder is enough for all subdomains! 🌟
🇷🇺 Русский
# 🚀 vServer - Функциональный веб-сервер на Go
> Функциональный веб-сервер с поддержкой HTTP/HTTPS, MySQL, PHP и GUI-админкой
**👨💻 Автор:** Суманеев Роман
**🌐 Сайт:** [voxsel.ru](https://voxsel.ru)
**📞 Контакт:** [VK](https://vk.com/felias)
## 🎯 Возможности
### 🌐 Веб-сервер
- ✅ **HTTP/HTTPS** сервер с поддержкой SSL сертификатов
- ✅ **Proxy сервер** для проксирования запросов
- ✅ **PHP сервер** со встроенной поддержкой PHP 8
- ✅ **Статический контент** для размещения веб-сайтов
- ✅ **vAccess** - система контроля доступа для сайтов и прокси
### 🗄️ База данных
- ✅ **MySQL сервер** с полной поддержкой
### 🔧 Администрирование
- ✅ **GUI Админка** - Wails desktop приложение с современным интерфейсом
- ✅ **Управление сервисами** - запуск/остановка HTTP, HTTPS, MySQL, PHP, Proxy
- ✅ **Редактор сайтов и прокси** - визуальное управление конфигурацией
- ✅ **vAccess редактор** - настройка правил доступа через интерфейс
## 🏗️ Архитектура
```
vServer/
├── 🎯 main.go # Точка входа основного сервера
│
├── 🔧 Backend/ # Основная логика
│ │
│ ├── admin/ # | 🎛️ GUI Админка (Wails) |
│ │ ├── go/ # | Go backend для админки |
│ │ └── frontend/ # | Современный UI |
│ │
│ ├── config/ # | 🔧 Конфигурационные файлы Go |
│ ├── tools/ # | 🛠️ Утилиты и хелперы |
│ └── WebServer/ # | 🌐 Модули веб-сервера |
│
├── 🌐 WebServer/ # Веб-контент и конфигурация
│ │
│ ├── cert/ # | 🔐 SSL сертификаты |
│ ├── soft/ # | 📦 MySQL и PHP |
│ ├── tools/ # | 📊 Логи и инструменты |
│ └── www/ # | 🌍 Веб-контент |
│
├── 📄 go.mod # Go модули
├── 🔨 build_admin.ps1 # Сборка GUI админки
└── 🚀 vSerf.exe # GUI админка (после сборки)
```
## 🚀 Установка и запуск
### 🔨 Сборка основного сервера
```powershell
./build_admin.ps1
```
Скрипт автоматически:
- Проверит/создаст `go.mod`
- Установит зависимости (`go mod tidy`)
- Проверит/установит Wails CLI
- Соберёт приложение → `vSerf.exe`
### 📦 Подготовка компонентов
1. Распакуйте архив `WebServer/soft/soft.rar` в папку `WebServer/soft/`
2. Запустите `vServer.exe` - основной сервер
3. Запустите `vSerf.exe` - GUI админка для управления
> 🔑 **Важно:** Пароль MySQL по умолчанию - `root`
### 📦 Готовый проект для пользователя
Для работы необходимы:
- 📄 `vSerf.exe` - GUI админка (опционально)
- 📁 `WebServer/` - конфигурация и ресурсы
> 💡 Папка `Backend/` и файлы `go.mod`, `main.go` нужны только для разработки
## ⚙️ Конфигурация
Настройка через `WebServer/config.json`:
```json
{
"Site_www": [
{
"name": "Локальный сайт",
"host": "127.0.0.1",
"alias": ["localhost"],
"status": "active",
"root_file": "index.html",
"root_file_routing": true
}
],
"Proxy_Service": [
{
"Enable": true,
"ExternalDomain": "git.example.ru",
"LocalAddress": "127.0.0.1",
"LocalPort": "3333",
"ServiceHTTPSuse": false,
"AutoHTTPS": true
}
],
"Soft_Settings": {
"mysql_port": 3306, "mysql_host": "127.0.0.1",
"php_port": 8000, "php_host": "localhost",
"proxy_enabled": true
}
}
```
**Основные параметры:**
- `Site_www` - настройки веб-сайтов
- `Proxy_Service` - конфигурация прокси-сервисов
- `Soft_Settings` - порты и хосты сервисов (MySQL, PHP, proxy_enabled)
### 🌐 Alias с поддержкой Wildcard
Для сайтов поддерживается wildcard (`*`) в алиасах:
```json
{
"alias": [
"*.test.ru", // Все поддомены voxsel.ru
"*.test.com", // Все поддомены voxsel.com
"test.com", // Точное совпадение
"api.*" // api с любой зоной
],
"host": "test.ru"
}
```
**Примеры работы wildcard:**
- `*.example.com` → `api.example.com`, `admin.example.com`, `test.example.com` ✅
- `example.*` → `example.com`, `example.ru`, `example.org` ✅
- `*example.com` → `test-example.com`, `my-example.com` ✅
- `*` → любой домен ✅ (осторожно!)
- `example.com` → только `example.com` ✅ (без wildcard)
### 🔄 Прокси-сервер
Прокси-сервер позволяет перенаправлять внешние запросы на локальные сервисы.
**Параметры Proxy_Service:**
- `Enable` - включить/отключить прокси (true/false)
- `ExternalDomain` - внешний домен для перехвата запросов
- `LocalAddress` - локальный адрес сервиса
- `LocalPort` - порт локального сервиса
- `ServiceHTTPSuse` - использовать HTTPS для подключения к локальному сервису (true/false)
- `AutoHTTPS` - автоматически перенаправлять HTTP → HTTPS (true/false)
**Пример множественных прокси:**
```json
"Proxy_Service": [
{
"Enable": true,
"ExternalDomain": "git.example.com",
"LocalAddress": "127.0.0.1",
"LocalPort": "3000",
"ServiceHTTPSuse": false,
"AutoHTTPS": true
},
{
"Enable": false,
"ExternalDomain": "api.example.com",
"LocalAddress": "127.0.0.1",
"LocalPort": "8080",
"ServiceHTTPSuse": false,
"AutoHTTPS": false
}
]
```
#### 📖 Подробное описание параметров:
**`ServiceHTTPSuse`** - протокол подключения к локальному сервису:
- `false` - vServer подключается к локальному сервису по HTTP (по умолчанию)
- `true` - vServer подключается к локальному сервису по HTTPS
**`AutoHTTPS`** - автоматический редирект на HTTPS:
- `true` - все HTTP запросы автоматически перенаправляются на HTTPS (рекомендуется)
- `false` - разрешены как HTTP, так и HTTPS запросы
**Схема работы:**
```
Клиент (HTTP/HTTPS) → vServer (проверка AutoHTTPS) → Локальный сервис (ServiceHTTPSuse)
```
**Применение изменений:**
- Введите команду `config_reload` в консоли для перезагрузки конфигурации
- Изменения применятся к новым запросам без перезапуска сервера
## 🔒 vAccess - Система контроля доступа
vServer включает гибкую систему контроля доступа **vAccess** для сайтов и прокси-сервисов.
### 📁 Расположение конфигураций
**Для сайтов:**
```
WebServer/www/{host}/vAccess.conf
```
**Для прокси:**
```
WebServer/tools/Proxy_vAccess/{domain}_vAccess.conf
```
### ⚙️ Основные возможности
- ✅ **IP-фильтрация** - разрешение/блокировка по IP адресам
- ✅ **Контроль путей** - ограничение доступа к определённым директориям
- ✅ **Фильтрация файлов** - блокировка по расширениям (*.php, *.exe)
- ✅ **Исключения** - гибкие правила с exceptions_dir
- ✅ **Кастомные ошибки** - редиректы или страницы ошибок
### 📝 Пример конфигурации
```conf
# Разрешаем админку только с локальных IP
type: Allow
path_access: /admin/*, /api/admin/*
ip_list: 127.0.0.1, 192.168.1.100
url_error: 404
# Блокируем опасные файлы в uploads
type: Disable
type_file: *.php, *.exe, *.sh
path_access: /uploads/*
url_error: 404
```
### 📚 Документация
Подробная документация по vAccess:
- **Для сайтов:** см. `WebServer/www/{host}/vAccess.conf` (примеры в файле)
- **Для прокси:** см. `WebServer/tools/Proxy_vAccess/README.md`
## 📝 Логирование
Все логи сохраняются в `WebServer/tools/logs/`:
- 🌐 `logs_http.log` - HTTP запросы (включая прокси P-HTTP)
- 🔒 `logs_https.log` - HTTPS запросы (включая прокси P-HTTPS)
- 🔄 `logs_proxy.log` - Ошибки прокси-сервера
- 🗄️ `logs_mysql.log` - MySQL операции
- 🐘 `logs_php.log` - PHP ошибки
- ⚙️ `logs_config.log` - Конфигурация
- 🔐 `logs_vaccess.log` - Контроль доступа для сайтов
- 🔐 `logs_vaccess_proxy.log` - Контроль доступа для прокси
## 🔐 SSL Сертификаты
### Установка сертификата
1. Откройте каталог `WebServer/`
2. Создайте папку `cert/` (если её нет)
3. Создайте папку с именем вашего домена или IP-адреса
4. Поместите в неё файлы сертификатов с **точными** именами:
```
certificate.crt
private.key
ca_bundle.crt
```
5. Сертификат будет автоматически загружен при запуске сервера
### 📁 Структура сертификатов
```
WebServer/
└── cert/
├── example.com/ # Основной домен
│ ├── certificate.crt
│ ├── private.key
│ └── ca_bundle.crt
│
└── sub.example.com/ # Поддомен (опционально)
├── certificate.crt
├── private.key
└── ca_bundle.crt
```
### 🎯 Работа с поддоменами
**Важно:** Если для поддомена не создана отдельная папка в `cert/`, то автоматически будет использоваться сертификат родительского домена.
**Примеры:**
- ✅ Запрос к `example.com` → использует сертификат из `cert/example.com/`
- ✅ Запрос к `sub.example.com` (папка существует) → использует `cert/sub.example.com/`
- ✅ Запрос к `sub.example.com` (папка НЕ существует) → использует `cert/example.com/`
**Это удобно для wildcard-сертификатов:** достаточно одного сертификата в папке основного домена для всех поддоменов! 🌟